We are all aware that current burglary trends are to break through back gates, smash a patio window to steal your car keys and of course any attached keys.
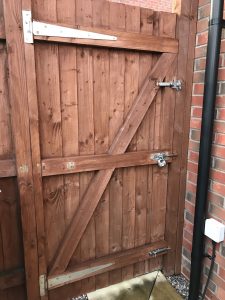
A simple solution is to make your back garden not a prospect. So as a first step we will look at reinforcing the standard 3-bar gate that builders such as Persimmon fit to all new houses.
First rule when reinforcing any door is to ensure the frame / gateposts are secure to the wall and support posts are secured in turn, to these.
You will note that the main posts are nailed into the brickwork with a couple of very large Builders nails, then the gateposts are nailed onto this post.
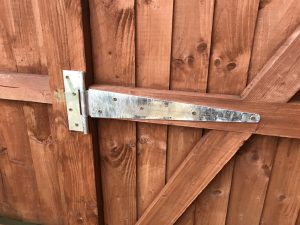
This is how insecure the centre bar is:
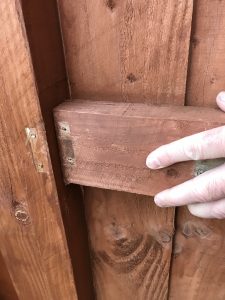
It is an easy matter to drill a 6-8mm hole (to match screw-head diameter) halfway into a 3inch thick post and then run a 3in long screw through into the next post. Pre-drilling thin pilot holes for screws also prevents the post splitting so avoiding you accidentally weakening it as you attempt to strengthen it.
Do the same on the hinge post if needed.
Looking at the gate we see the top and bottom cross-bars are hinged whilst the locking bolt is on the unsecured centre bar.
So our first step is to add a third hinge at this point to make this centre bar very rigid to support the locking bolt.
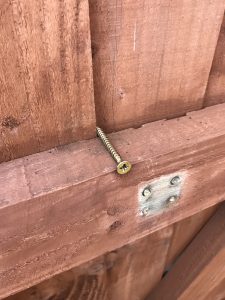
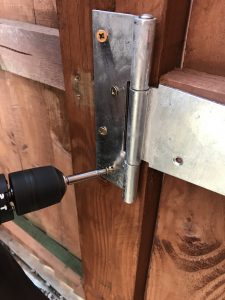
This type of hinge is known as a 45mm Tee Hinge (Zinc Plated). The fitted ones are usually medium duty ( approx.£3.50 at Sheppards, Wickes Product code: 159765, Toolstation code: 98708 etc) but I purchased a pair of heavier duty ones (Thicker metal and wider) to do a couple of gates at around £14 a pair. To fit them I suggest a screw of 5mm thick x 50mm long for extra strength. I found a nice sturdy tub of 200 in Aldi for about £3.50 but obviously Screwfix, Toolstation and every D.I.Y. shop like Sheppards are very competitive . I would suggest a box of 100 / 200 for this project at (200 approx. £4.70) but only 9 are actually required to fix this type of hinge. Obviously we will fit them with a power Screw Driver!
Trial fit the fence post end with 2 short screws and the triangular side with one and test the hinge swings properly.
Once you are happy secure with the long screws.
MAGIC D.I.Y. TIP 1 : Use a lubricant on each screw to run them in with minimal effort from your power driver. Grease, wax or a solid soap bar is great for rubbing the screws across. Washing up liquid and liquid soaps have salt so will promote early rust, which we don’t really want but kitchens are full of fats, greases and oils if you don’t do much D.I.Y.! This amazing tip will make fitting and removal easier and prolong battery life.
This tip will make the next step so easy > Remove a screw from any hinge already fitted and you will see they are probably 4mm x 30mm screws. You will then realise that you can easily remove each screw and refit one of your 5 x 50mm ones, one at a time and all of your hinges will be secured twice as strongly as before without upsetting any geometry.
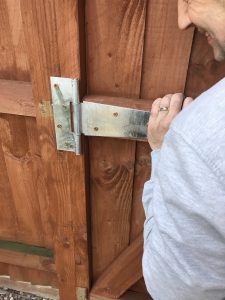
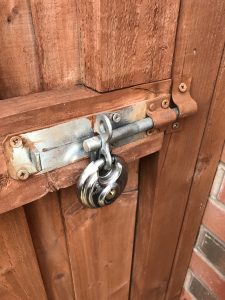
Now you will notice that the gate feels far sturdier than before. So we now see the weak point is the gate bolt. These hook handled locks are Called 6 inch (150mm) ‘Brenton’ bolts and are quite robust and are designed to have a padlock, but again they are fitted with small, weedy screws, so pull them out one by one and beef up the way the bolt is secured.
MAGIC D.I.Y. TIP 2 : If any holes look big compared to the screw heads or are square to take a coach bolt, simply using a suitable washer behind the screw head will spread the load and reinforce any weedy looking parts of the bolt or catcher loop. The bigger and thicker the better!
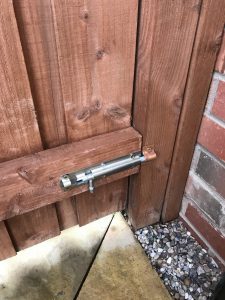
Looking at the gate we now see that to secure another crossbar would make the gate stronger and securing all will create a gate which is 3 times more secure. Brenton bolts are approx. £5 each and other bolt designs can even be seen in the pound shops, but a bolt with a larger pull handle is easier to throw shut (especially with cold or old fingers!) and facility to fit a padlock through is always a good option. Logic says to me that if someone were to try to kick a gate down, then we should secure the bottom crossbar with a bolt, This is because a kick will strike the lower half of the gate. It is also less accessible than reaching over for a top gate bolt as the bottom gap is usually quite near the floor to reach through. Fit the bolt with a couple of short screws to ensure it throws easily then fix it securely with your big screws. Weighing up the additional cost, I would prefer to fit a third bolt as the gate will now be the equivalent of your 3-locking lever front or back door.
Now lock the bolts and go around and test how strong the gate now feels. There will be no give and it will feel as secure as a solid oak door!
The final step is to buy 1, 2 or 3 of the extra strong Diskus design round padlocks. Stores such as Homebase often keep packs of 3 with matched keys, so you fit 3 padlocks but only need to carry 1 key. At the minimum, keep the centre bolt padlocked. Security is about developing good securing habits, so if you fit any device, just get everyone into the habit of using it, every time.
REMEMBER THE PSYCHOLOGY OF THE THIEF IS FIND AN EASY WAY IN AND HAVE A QUICK ESCAPE ROUTE. THIS UPGRADE WILL GO A LONG WAY TO MAKING YOUR PROPERTY A NO-GO PROSPECT.